The goal of creating a PageCarton theme is to help users of PageCarton create and customize their site and apps fast and easy. Creating a PageCarton theme is a very easy process but a lot of times, we should go an extra mile so that our users can even have more customization options.
Get a clean HTML-based template
Get your already-designed HTML-based template file ready. lt may be a template design of your own. A template in PageCarton is simply a ZIPed html files. You may as well get a clean HTML-based template (zip file) from w3layouts.com or similar sites. We have a list of other places you can get already designed HTML templates to start fast. Where to get Free HTML Templates to Build PageCarton Themes
https://youtu.be/HwR0FpfHJ5Q
Import the template into your PageCarton admin panel
You build the PageCarton theme from within a PageCarton Admin Panel. If you don't have your own copy of PageCarton installed, you may create a free account on PageCarton.com to begin to build themes ASAP.
https://youtu.be/pVMJa4Tarac
-
Go to your PageCarton Admin Panel
-
Click on 'Appearance' in the menu to the left
-
Proceed to 'Themes'
-
Click 'Upload new theme'
-
Enter a 'Theme name' of your chouse. The theme name should be the same name of the template if a template was downloaded from another source.
-
Upload your theme archive
-
Leave the 'Theme Update Options' as they are
-
Save to complete the process.
-
-
Close the pop-up Screen
-
The new theme should listed on the list of Themes.
-
Under the new added theme, within the 'options' click on 'Preview' to confirm that all the components of the theme are displaying correctly.
Integrate PageCarton Functions
PageCarton brings life into every HTML code by making it dynamic automagically. Contents will become easily manageable through different publishing methods in PageCarton. It only takes a few moments. Edit the theme to ensure people that want to build their websites and apps with it can do it effortlessly. That is the purpose of PageCarton Themes. Users of the theme should be able to use the basic tools to update the sites It is good to do all the updates in the 'Code View' of the HTML Text widgets. Basically, themes that will pass as Standard PageCarton Theme must:
- Be suitable for either of 'Blog', 'Corporate Site', 'E-commerce', 'Personal' categories of sites or any other categories listed on the PageCarton Themes Repository.
- Be generic, so that if it is a blog theme, it could good for 'Fashion' blog and 'Politics'.
- All the theme contents must be editable using the 'Website Wizard' utility.
The standards are set to help us cater for our growing community of users at this point.
Update: We encourage that the new syntax be used to integrate PageCarton Functions instead of what is described below. Learn the new syntax here: HTML Syntax & API for Embedding Widgets - PageCarton Posts
Everything explained below is now obsolete. Visit the following link to continue building a theme HTML Syntax & API for Embedding Widgets - PageCarton Posts
....
Update Content
Follow the following steps to make this
-
On the list of themes and under the 'options' of the theme we are working on, click 'Edit Theme'
-
On the popped up screen, click 'Edit Main Layout'
-
When all is loaded, click on 'Widget Options', this should bring up a lot of options to add content
-
Update the logo area to use the following HTML code
<img style="max-height:100px;" src="/img/logo.png" alt="{Organization Name}">https://youtu.be/tXnBqz_M5-4
-
Make all the forms work by embeding the in-built widgets using details on Linking HTML forms to PageCarton Forms. The following forms usually come with themes:
-
Contact Forms
-
Email Opt-in Form
-
Sign in Form
-
Sign Up Form
-
Search Form
-
-
Use the repleaceble static texts as defined in Standard Replaceable Texts to use in Building Themes. Replace all dummy text contents with these replaceable texts.
https://youtu.be/uw9JcqKE7b8
-
If there are items like posts on the theme, embed all the posts so they can be automated using "Application_Article_ShowAll" widget. Watch this videos to understand more. Use only standard post types so that when users change themes, they don't need to add new content. Check out Standard Post Types Parameters in Embedding Widgets for the required parameters for specific post types. The following are other important parameters
https://youtu.be/hRyzd_1edoI-
'add_a_new_post' - set to the number of post you want displayed by default e.g. 3. This will ensure there is a dummy post shown whenever the user have not added any content
-
length_of_description - limit the character lenght of the 'article_description' variable
-
length_of_title - limit the character length of the article_title variable.
-
- All dummy navigation links are to be removed.
- All navigation links and options not suitable for the category of themes should be removed and replaced with 'Ayoola_Menu' widget embedded.
-
Other widgets to be embedded in the theme layout to build up dynamic contents themes are
-
Application_SiteInfo - to retrieve/access the site headline and description and the banner image from the database
-
Ayoola_Menu - to display navigation options
-
Ayoola_Page_Info - to retrieve/access current page headline and description from the database
-
-
If the theme has a "Post Viewer" - a template of the page used to view a single article/post, '/single' page. Duplicate it as "/post-viewer" to use it to view all posts or "/post-viewer-{{{post_type}}}" page to set it to view a specific post type. E.g. create '/post-viewer-article' to make a page a theme page to view post of article types. Embed the "Application_Article_View" widget on the page so it could retrieve the post data and display it on the page. The videos above will help understand how.
-
Create the "/default-layout" page in theme pages. Since the theme can't possibly include all the site pages, the default layout is the layout to be used for the all system pages that is not included in the theme. That is the page that will be used to create/edit new pages when this theme is set as default. To create a "/default-layout" page, you would need to duplicate an existing theme page and name the duplicate "/default-layout".
Colors
To futher allow users to personalize their sites it is important to provide flexibility in colors and theming of the pages. PageCarton users have been able to set prefered font colors and background colors for a long time, we could make use of this in our theme design. Beginners who are importing an existing templates should try as much as possible not to tamper with the template designs and colors. The following are the color guidelines:
- Determine which color is the theme color. Usually, template designers have hard-coded this colors into their CSS files.
- Identify where the colors are used - the CSS classes, selectors, etc which are referenced.
- Introduce inline CSS to overide the hardcoded declarations using the pagecarton color variables. This is an example of how to do this:
- Insert a HTML widget at the top the 'Main Theme Layout'
- Switch to Code View
- Insert a codes similar to this below:
<style> .bg-primary, .testimony-section .owl-dots .owl-dot.active, .gallery .icon, .ftco-footer .subscribe-form .form-group .submit:hover { background-color: {{{pc_background_color}}} !important; color: {{{pc_font_color}}} !important; } .btn.btn-primary { background: {{{pc_background_color}}}; border-color: {{{pc_background_color}}}; color: {{{pc_font_color}}}; } .btn.btn-primary:hover { border-color: {{{pc_background_color}}}; color: {{{pc_background_color}}}; } .ftco-navbar-light .container, .bg-darken, .blog-entry .meta-date, .ftco-footer .subscribe-form .form-group .submit { background: #000 !important; } </style> -
Click on advanced settings icon on the top right of the widget and embed any widget e.g. 'Application_Global'
-
Save the 'Main Theme Layout'.
-
Go to Page Settings to set a background color and the font color and see if it displays when you preview the theme.
-
Try to limit the colors in the design to just the two colors, the defined background color and the font color.
-
And do not create new color elements, just change the colors to match those defined by the users through the variables '{{{pc_background_color}}}' and '{{{pc_font_color}}}'
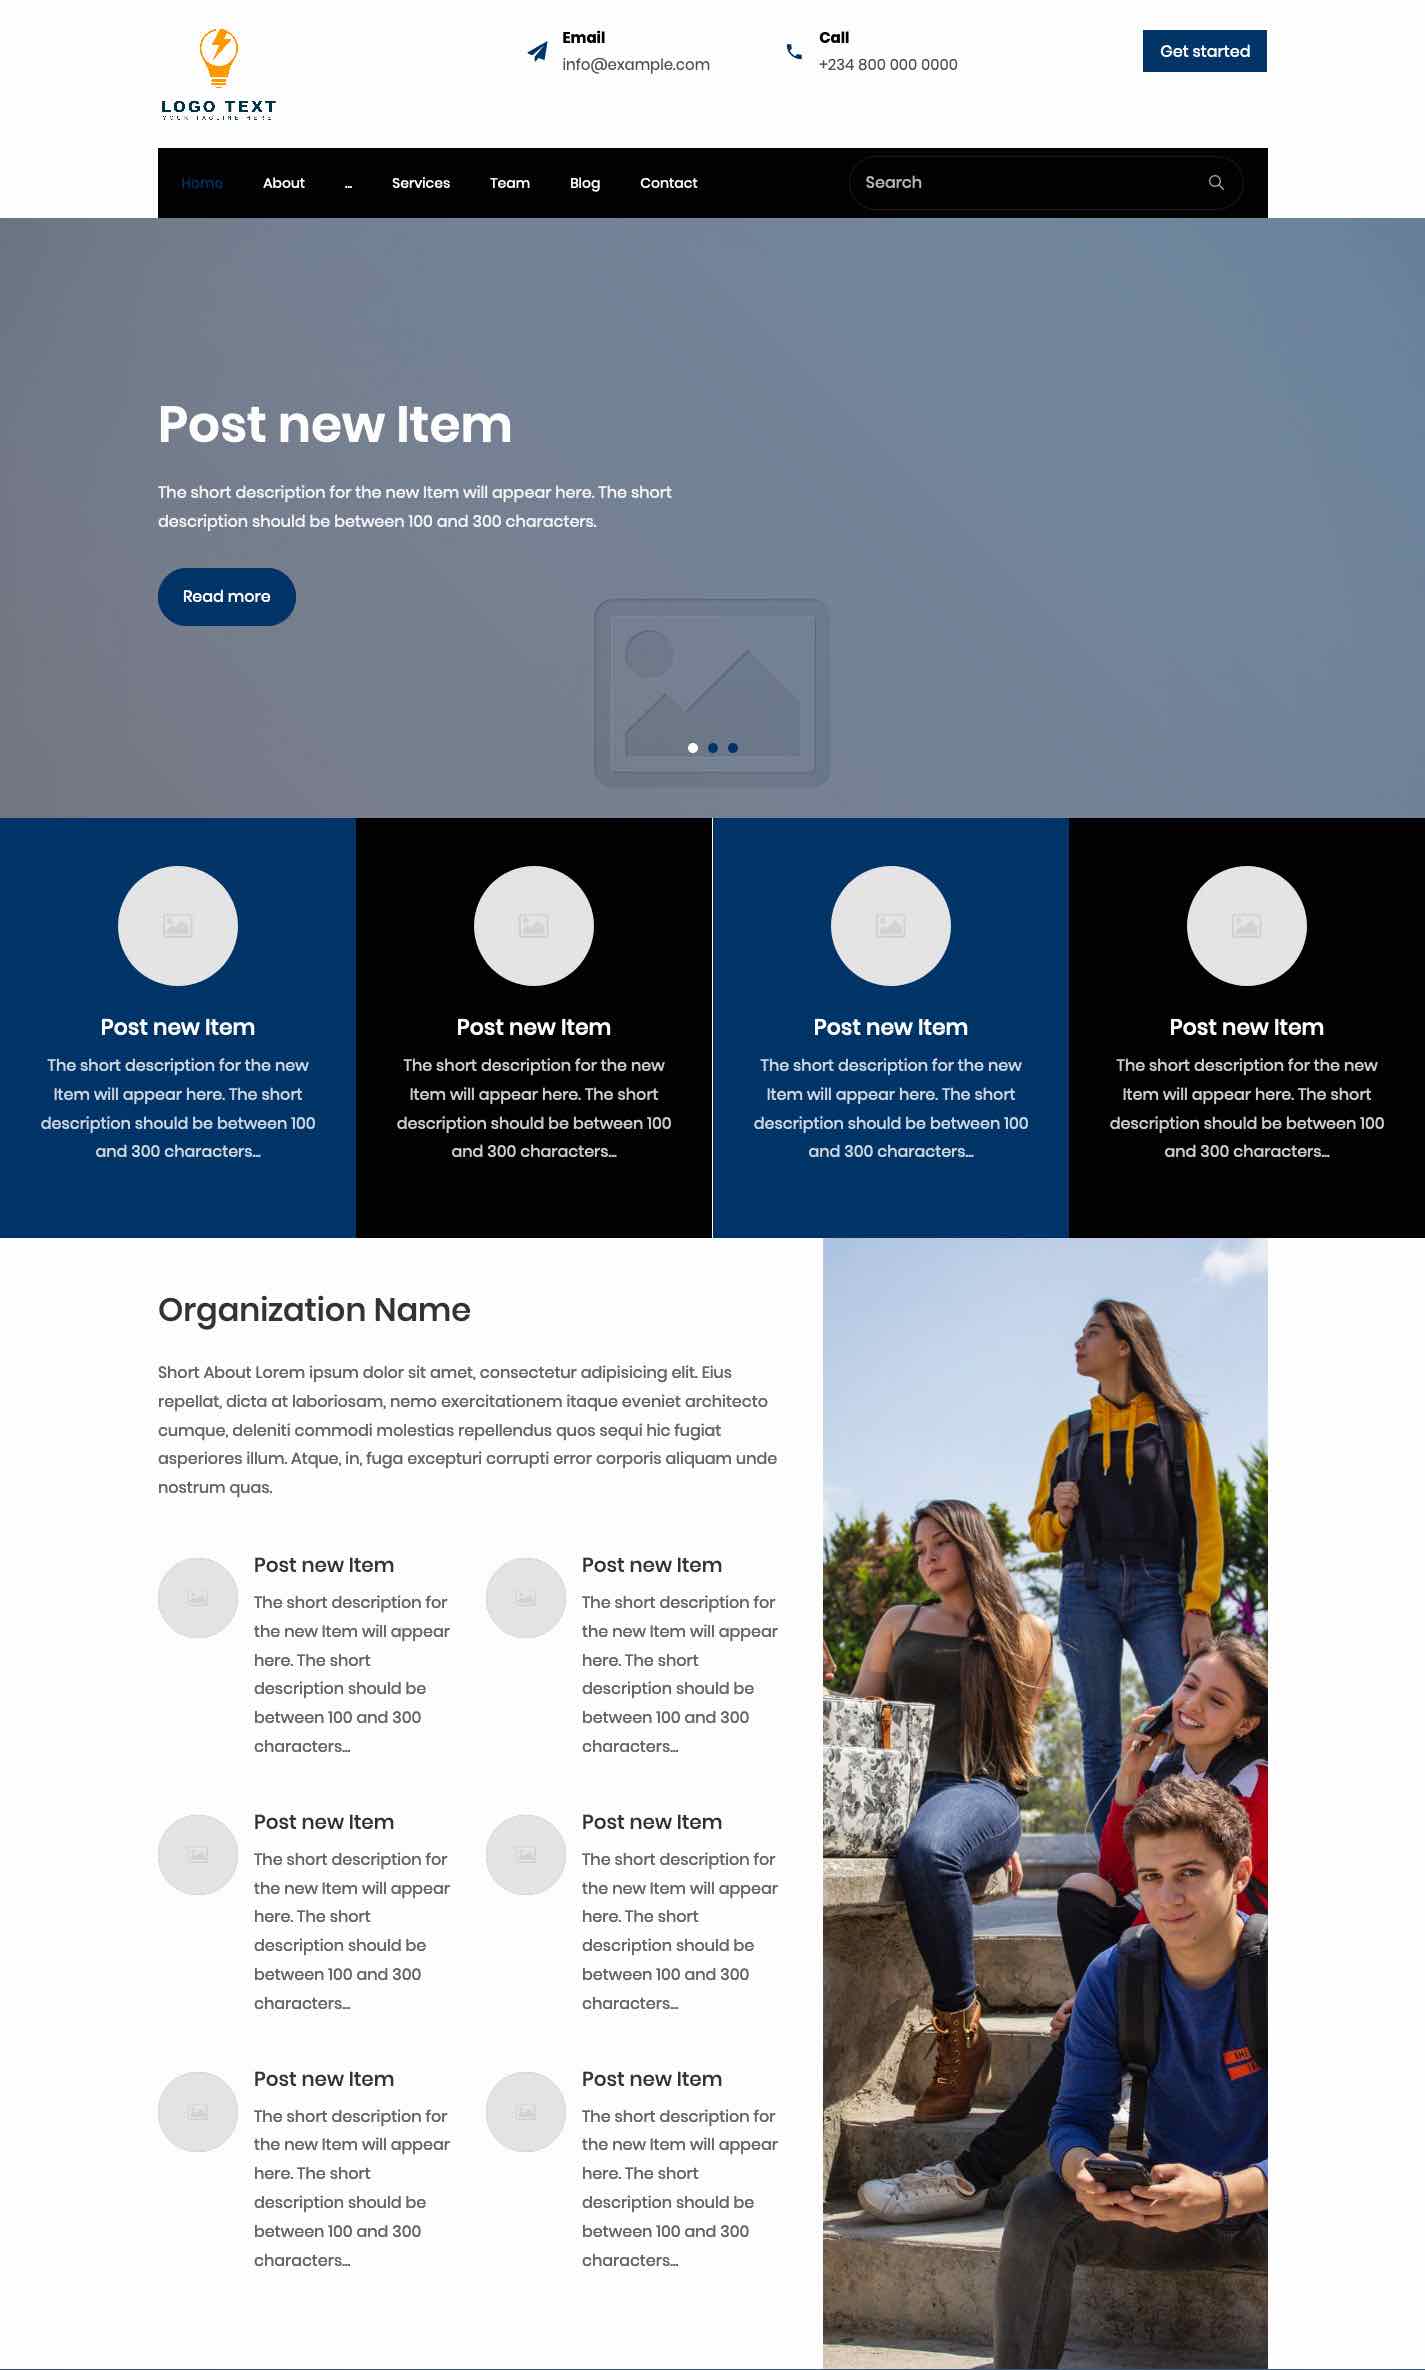
| Before Design | After Design |
|---|---|
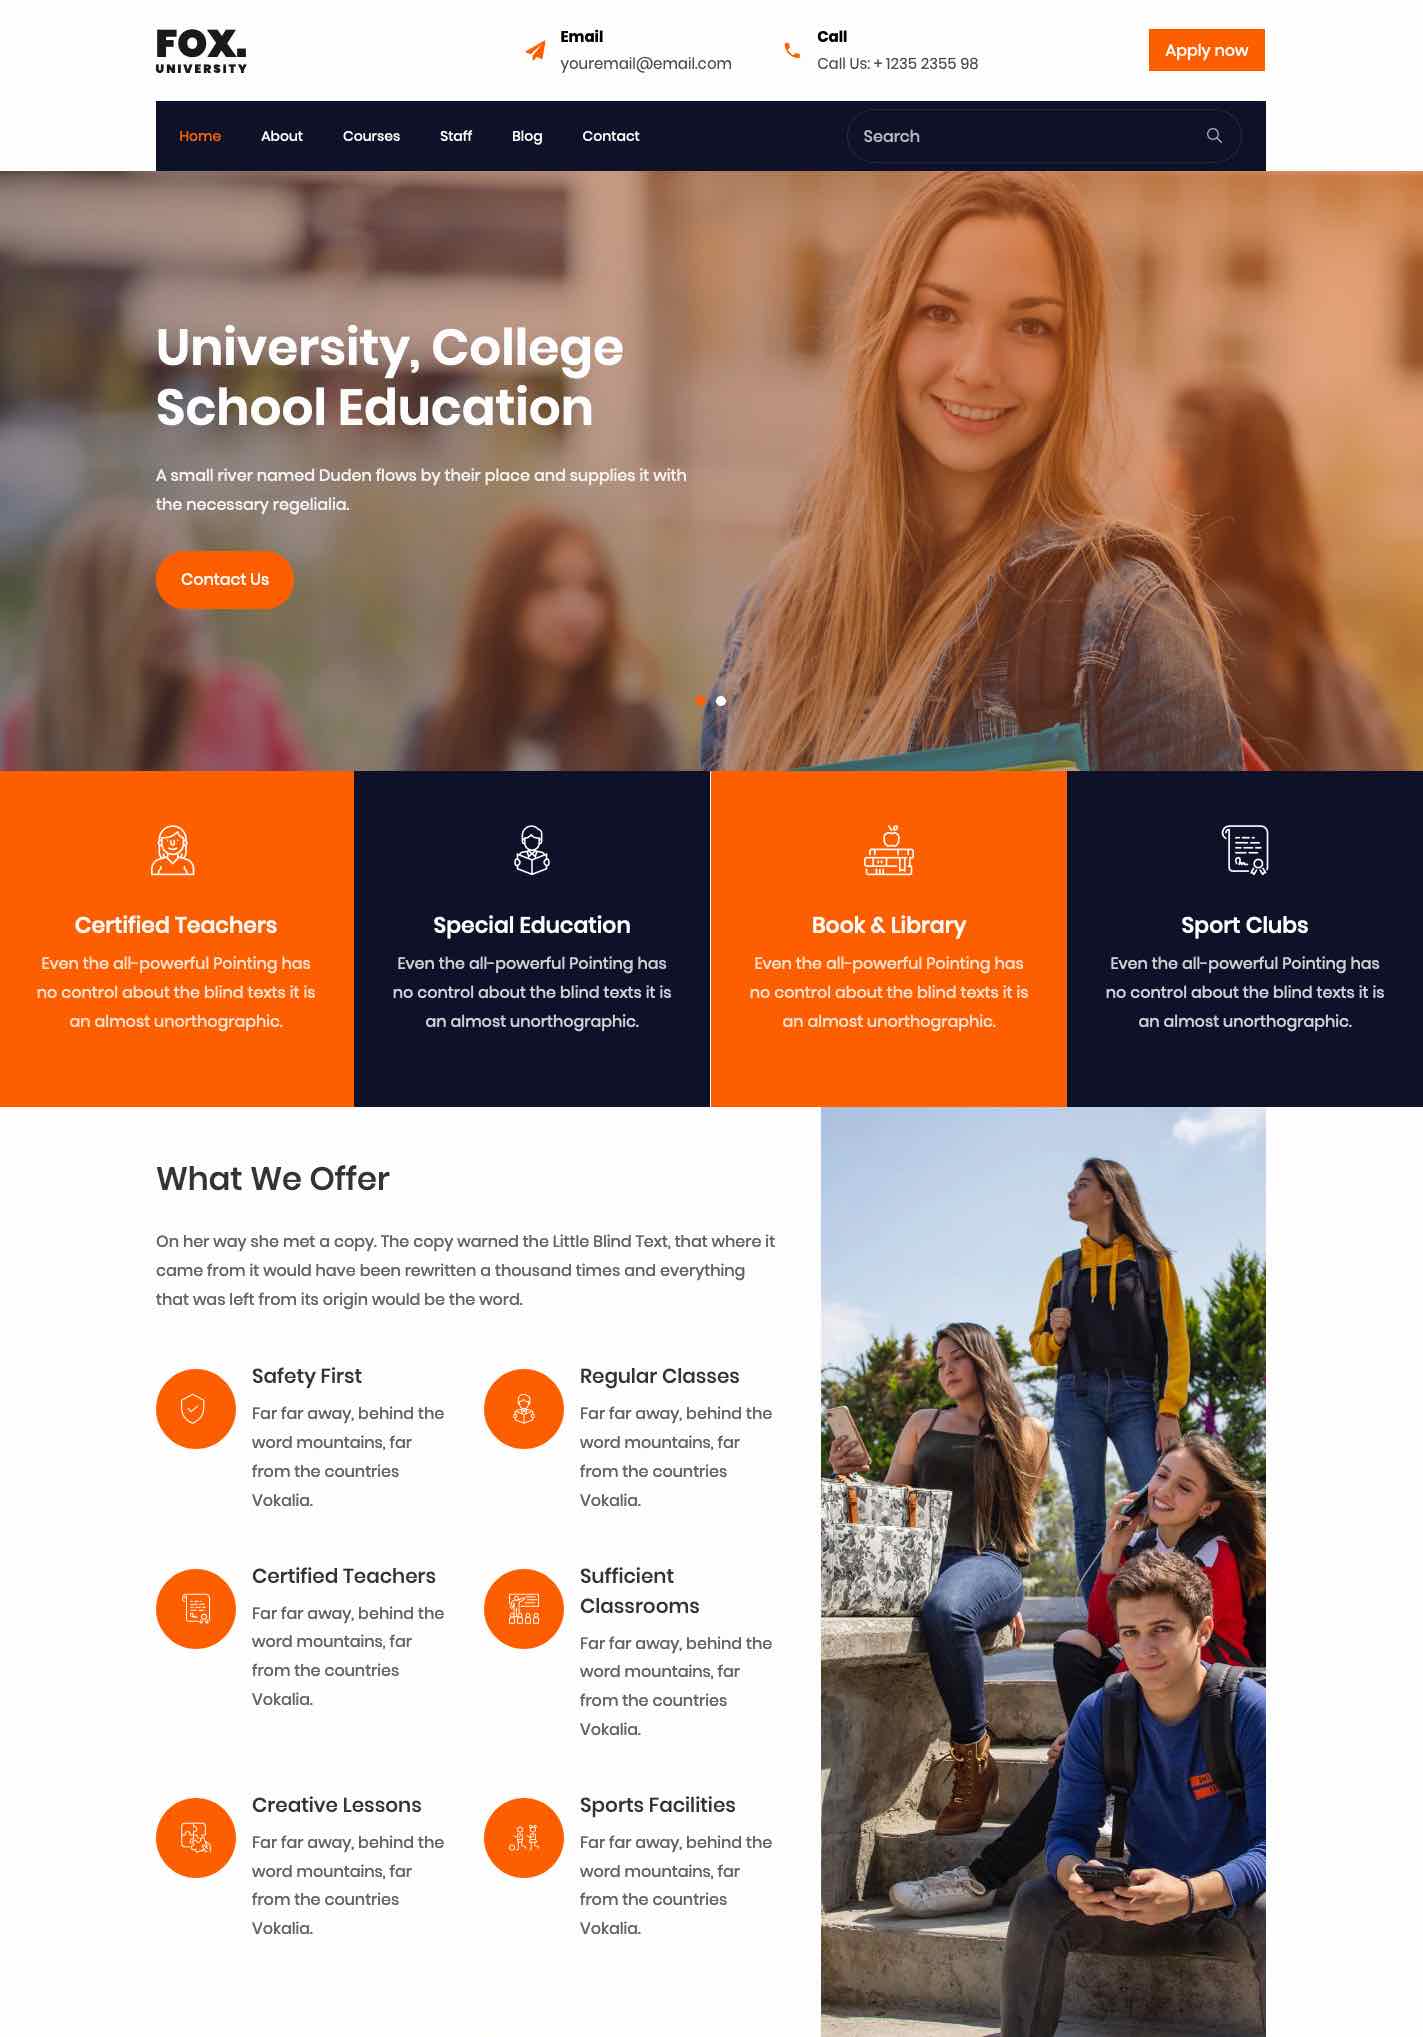 |
 |
Other things to do
- Test the theme by setting it as default and make sure all the pages are working.
- Export the theme
- Upload the theme to http://themes.pagecarton.org
- Share the theme info and link on social media
- Read more topics on Theme
- Watch videos on Building Themes for PageCarton